Monolith Modernisation Part 3 - Tools & Techniques
In the third part of this series on modernising monoliths, I provide an overview of tools and techniques that can help simplify your journey.
Changing a monolith with legacy code takes a lot of work. Improving the code in one place leads to an impact … somewhere… but it is probably unclear where the effect will be. It is not always immediately visible either, leading to situations where you discover the issue (too) late (in production?!). You want to change this to get more business value from your work!
The end goal of modernisation is to make the codebase easier to change, which can be split up into 3:
- Make testing easier and faster, as this lowers the risk of regressions when doing changes.
- Make the system more modular and loosely coupled so it is easier to understand and the cognitive load when making changes is smaller.
- Over time, deploy smaller parts of your system independently from one another to reduce the operational impact of putting a change in production.
At the same time, you want to keep your application stable during the change process. Meanwhile, ongoing business requests for functional evolutions (new features, bug fixes, …) must be interwoven into the technical evolution. Finally, there is the challenge of budget pressure. Estimating a serious refactoring is hard, and any number should be treated very carefully (spoiler: your estimate will be wrong… it remains an informed guess, no more, no less).
Considering all these constraints, the best approach is to work in small iterations, each bringing you a step closer to your goal. If you have to pause your journey, you will already benefit from the intermediate results, and you can continue later.
So, how do you organise this journey? And which tools are available to help you along the way? That is what you'll find in the sections below.
Please also note that this article will remain programming language and technology agnostic. Almost all the information can be applied regardless of your stack. Examples used are based on my personal experience & exposure, but do not let these limit you :)
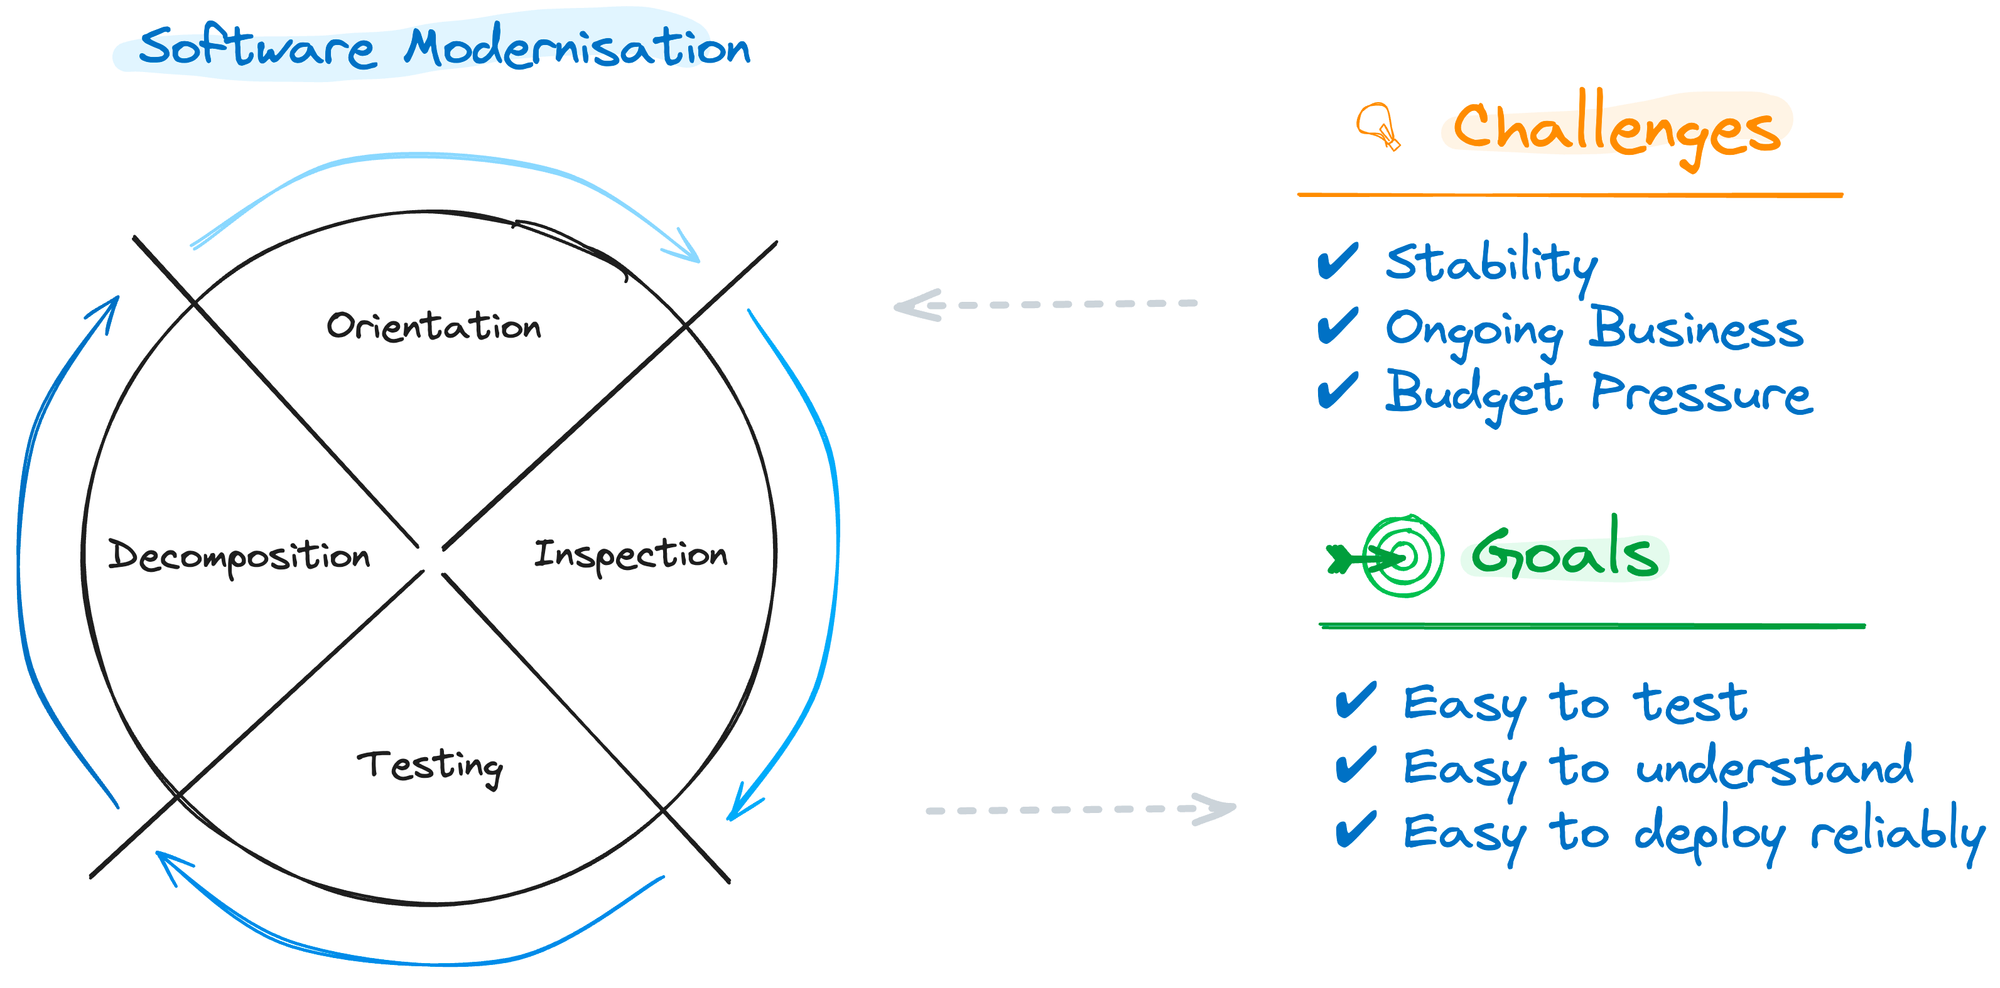
The Wheel of Software Modernisation
The wheel of software modernisation will provide you with a framework to organise your work around, taking into account the challenges while taking you—step by step—towards your goals.
Step 1: Orientation // Building High-Level Understanding of Where You Are
Your entry point into modernisation is building a proper and shared understanding of where you are now. This high-level but essential step gives you the (rough) direction but only some of the details (yet). It is a tool to emerge (tricky) questions and observations and to have conversations with business representatives and other stakeholders.
Two tools can help you to get a high-level view of your landscape and have this discussion: Wardley maps and DDD Strategic Context Maps.
Visualise the Modules in your Value Chain with Wardley Maps
Wardley maps give you an overview of the landscape and the relations among the components of your value chain. This gives you a great tool to identify areas where you make a difference and where a custom approach is valuable vs. places where outsourcing makes more sense.
In this example, a customer interacts with a mobile app and website that uses a monolith back-end composed of different functional areas. The axes (visibility in the value chain & evolution in terms of maturity) allow you to position the components and help you define the best implementation strategy (custom-built with agile techniques, buying a product or leveraging commodity services)
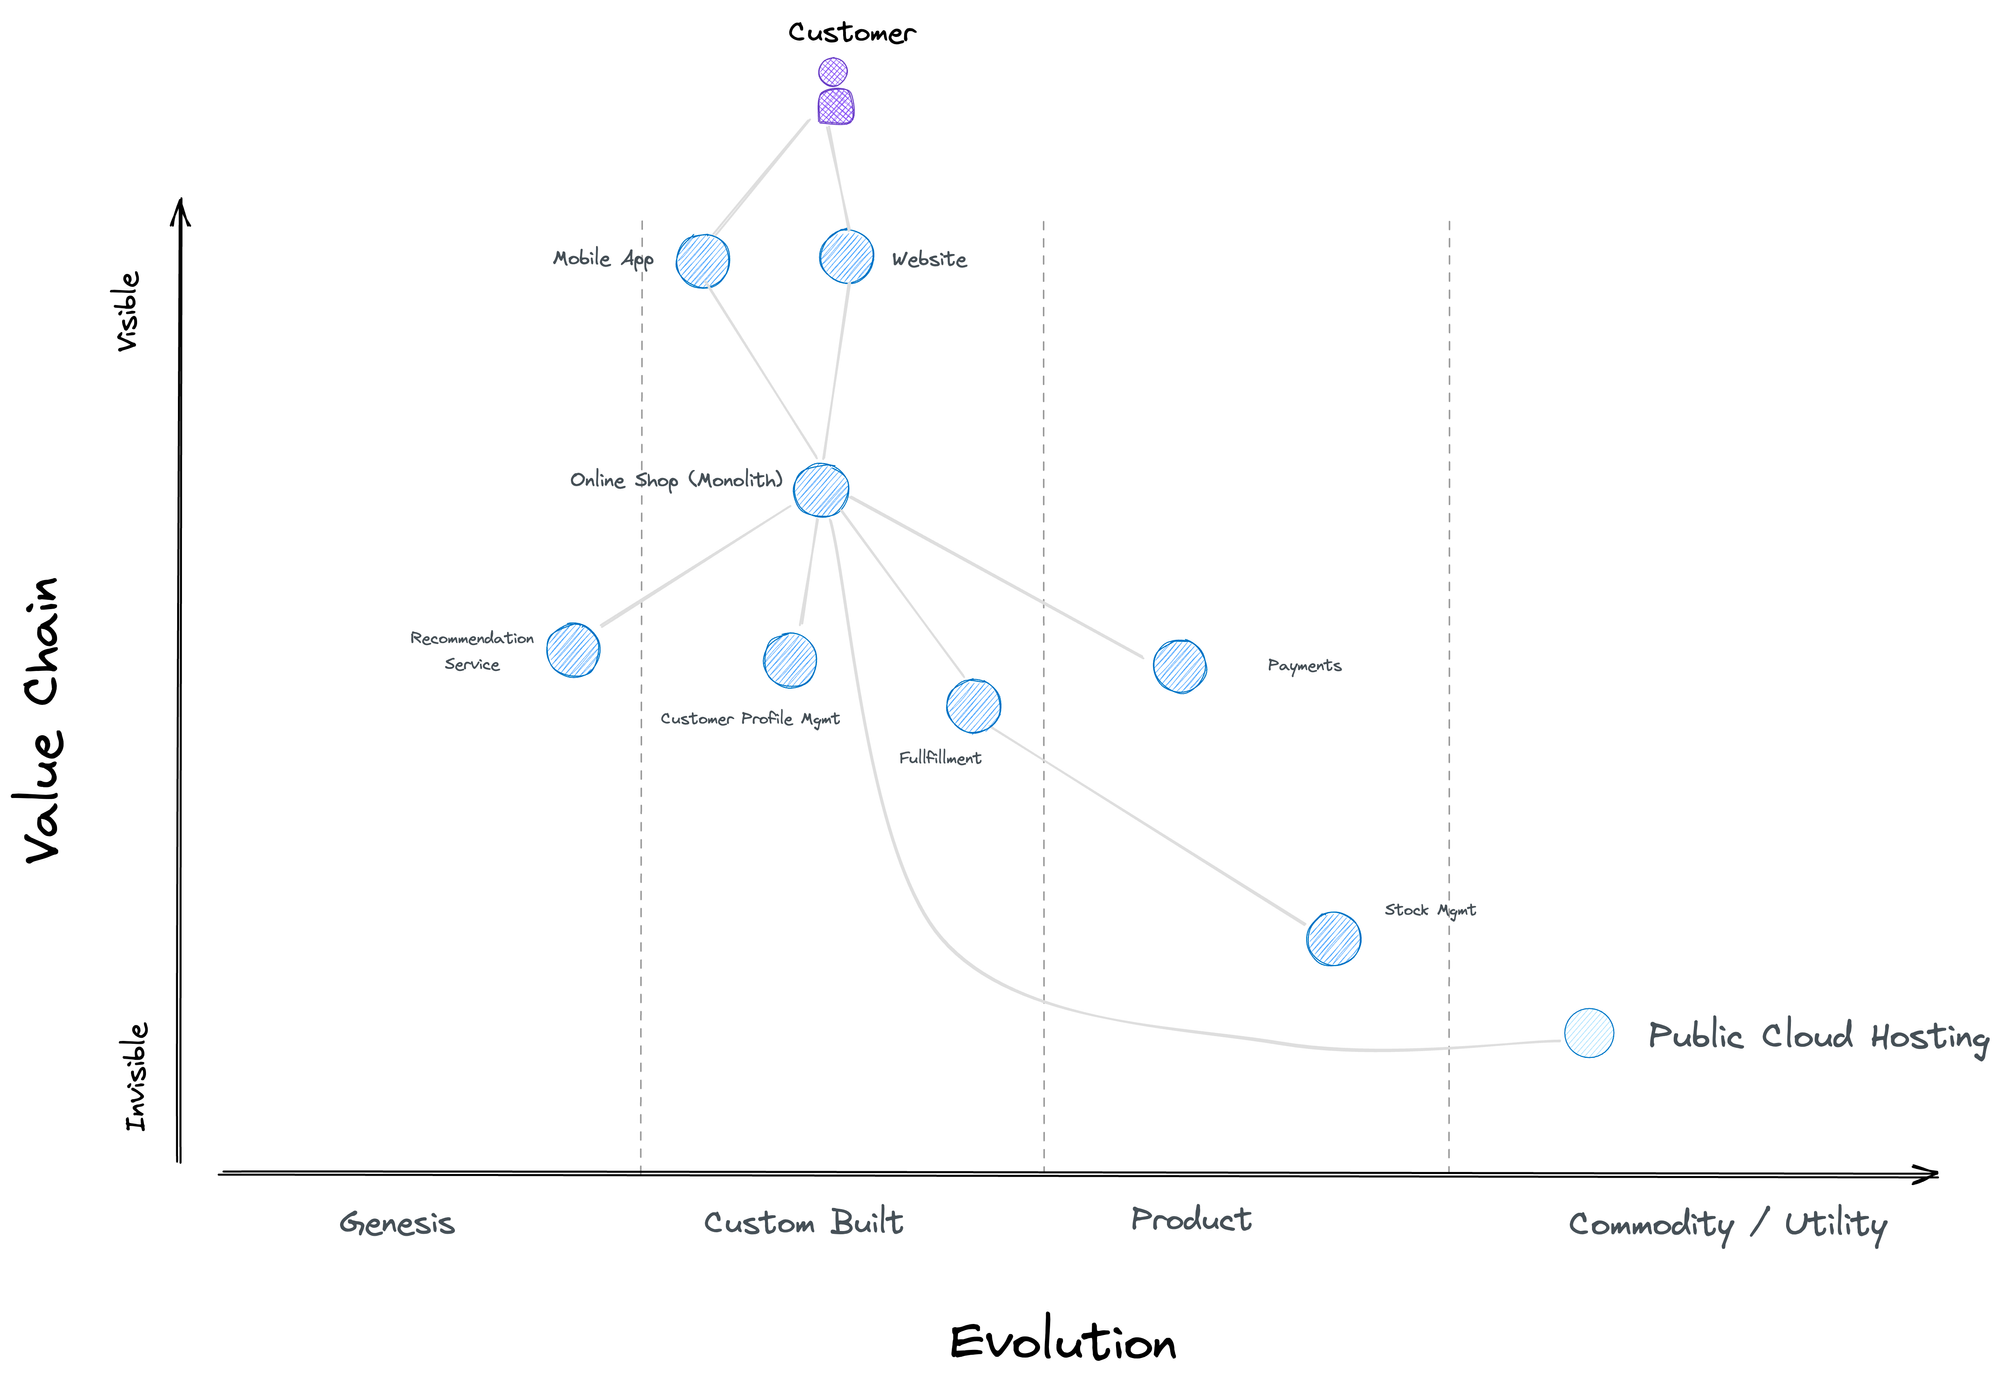
In modernising this monolith, each line represents a (possible) seam that can be made explicit and allow the components to be modernised. This diagram also shows which components are easier or harder to decouple: fulfilling has both incoming and outgoing dependencies, making it harder to isolate than, e.g., payments.
As you can imagine, it is possible to zoom in on the different components and see how the value chain can be further divided.
Identifying Seams to Create More Modularity
The Wardley Maps will allow you to explore the high-level seams that will provide you with signposts in your migration journey. Indeed, your understanding must help you identify seams
A seam is a place where you can alter behaviour in our program without editing in that place - Michael Feathers
Concretely, which part of the codebase, platform, and technology stack can be replaced without impacting the other components?
Example 1: Replace your hardware with public cloud services → The seam is at the OS or the container level. You do not need to change what is running inside the OS or container to change the layer beneath.
Example 2: Move reference data management to another team → The seam would be the interface towards the reference data service (e.g., through ports and adapters): You can change the service implementation without the callers having to change anything.
If no seam is present, the dependency must first be broken to have an explicit seam (a “contract” between modules if you want). This will allow a new implementation to replace the old one without impacting the caller.
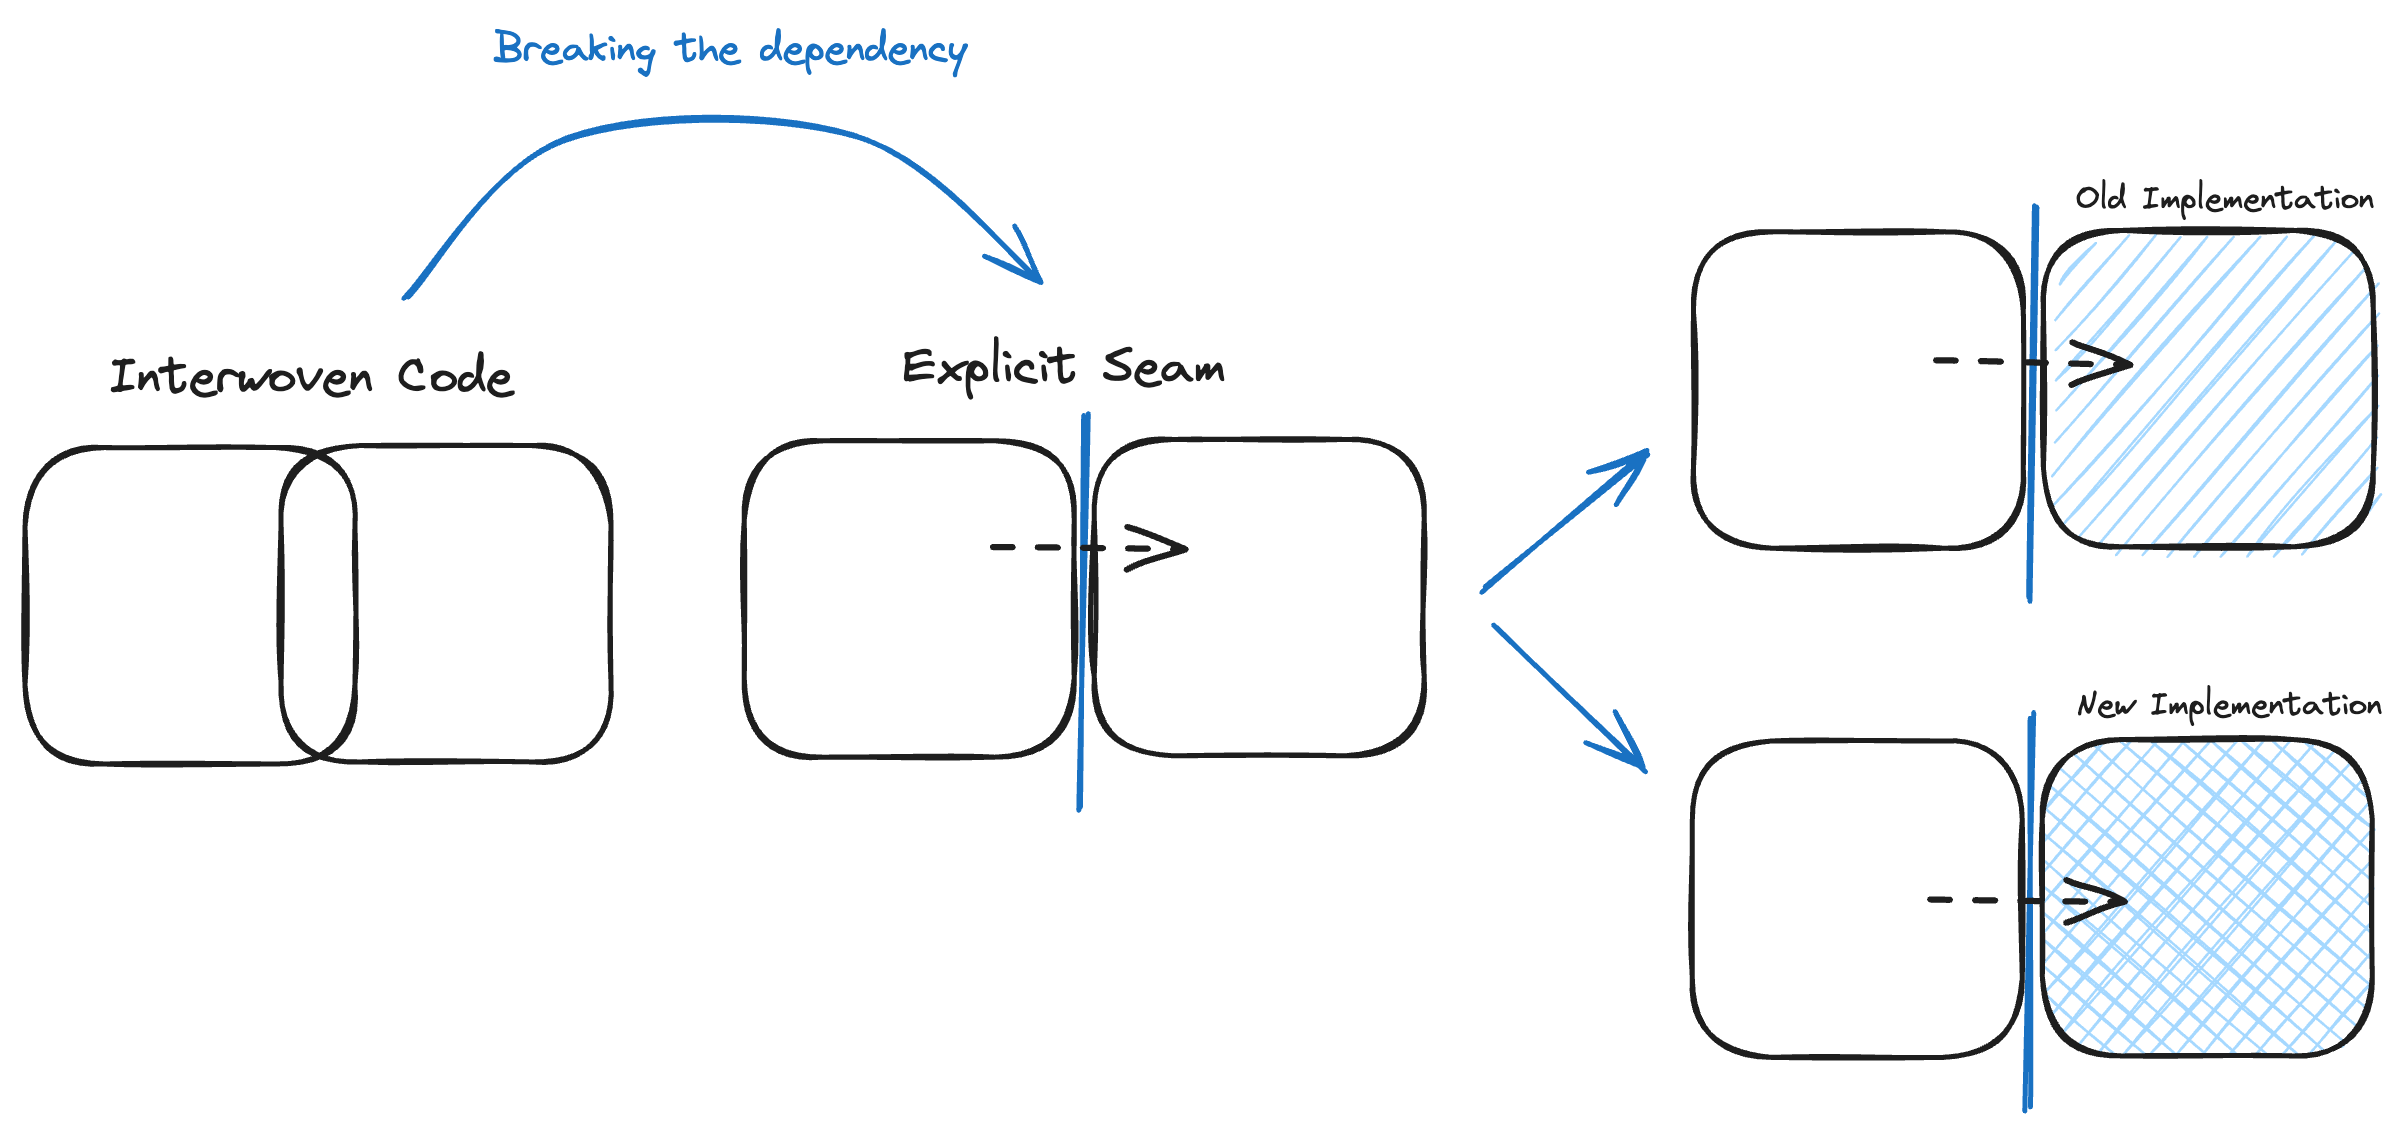
The best metaphor for this gradual approach is the strangler fig pattern.
A strangler fig is a new system that grows slowly around the edges of the old until the old system is strangled - Paraphrased from Martin Fowler
So, the critical question is: What is the best place to put your first (or next) seam? What modules can you separate, and how should the interface with the other modules look?
Let’s assume that in our example system “payments” is the first module we want to extract from the monolith. Furthermore, the decision was taken to use a third-party service because various products offer this functionality in a financially viable way for the shop case.
Type your Interfaces with Strategic DDD
Once you identify a seam, the next step is creating the contract between the components. Before you do so, it makes sense to think about the interface type. Which component leads and drives the change? Which component has to follow? Is there any shared code among the components that both must comply with?
Strategic Context Mapping allows us to represent and explore this integration model's technical consequences visually.
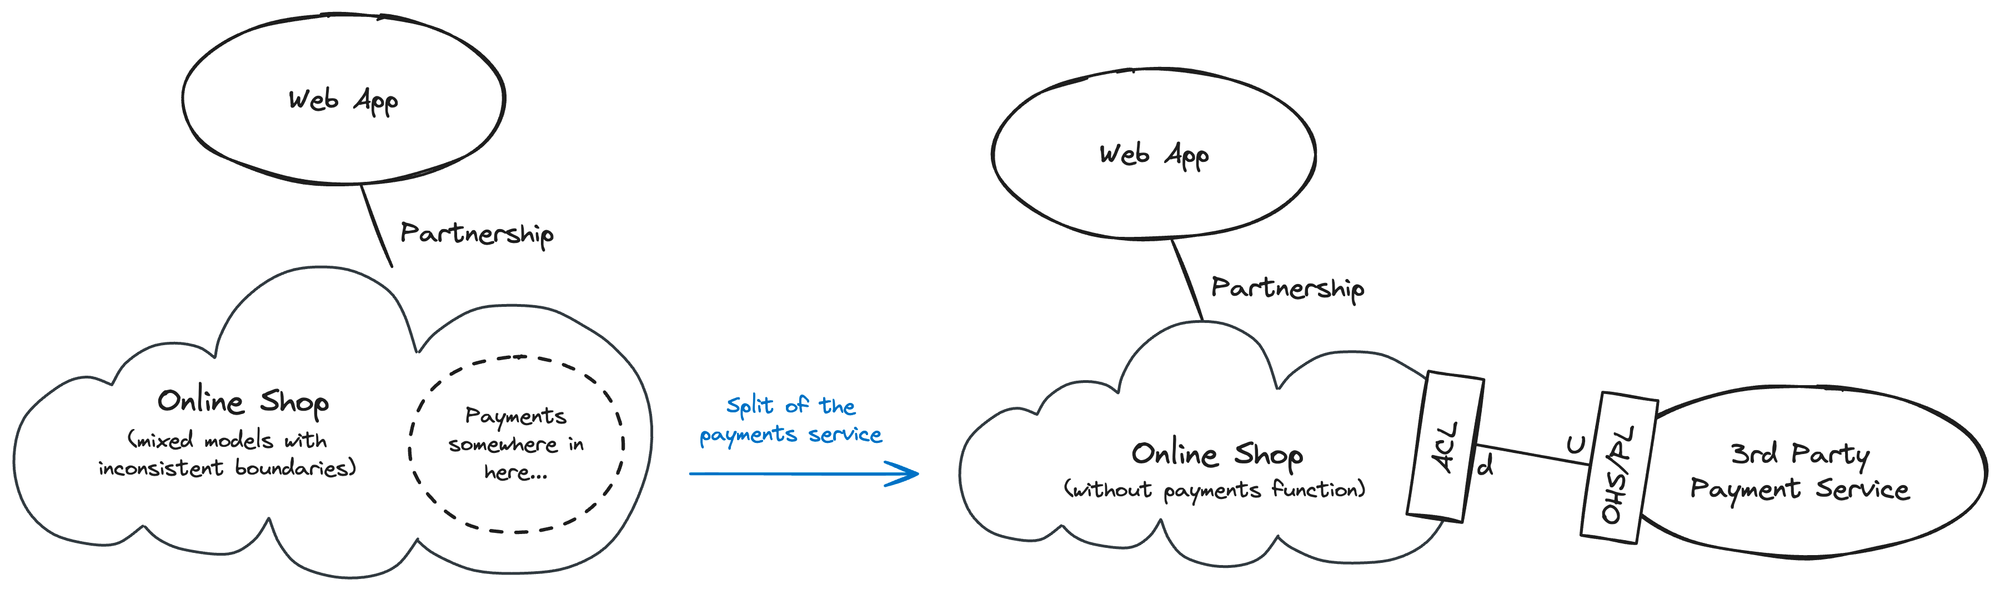
In our example, the third-party service provides several APIs and operates as a Open Host Service (OHS) offering documentation with a published language (PL) containing the key terms and concepts).
In this setting, the third-party service will drive the changes (it will be upstream), and the online shop will need to consume the service according to the contract defined by the host service.
An anti-corruption layer is advised to be less tightly coupled to the 3rd party service to facilitate future changes.
The relationship between the shop backbone and the mobile app remains untouched for the moment: in this partnership, the failure of either side will lead to the other side's failure.
This wraps up “Step 1: Orientation” of the Wheel of Software Modernisation. To get the wheel spinning, pick the first seam you want to address, ideally, a relatively simple capability that allows the team(s) to experiment, learn, and build operational readiness.
In the example case, we will use the payment service as it is at the edge of our system. This is the working assumption we will validate in step 2.
Step 2: Inspection // Confirm the Current & Actual Position
Two realities turn the work from step 1 into merely an assumption, nothing more…
- It is hard to understand a code base's intricacies.
- It is impossible to capture all nuances in a diagram.
This forces us to validate the work from step 1, which we will do now.
This kata is an interesting exercise to build the team's awareness of the code's understandability. Learning experiences like this will help your team mature and avoid the causes of legacy code in the first place. I've included this newsletter edition as a framework for structurally improving your software engineering performance, where learning is a core element.
To confirm that the seam is a seam and that we can swap (perhaps after the first round of refactoring) the old implementation(s) with a new one, we need to ensure that we have an in-depth and factually correct understanding of the code.
Three tools we can use to build this understanding are:
- The code navigation support of your IDE
- When the code is indirectly called, and links are not immediately spottable in the IDE, structured logging allows you to collect information (e.g., the calling function) and easily filter and report on this dimension.
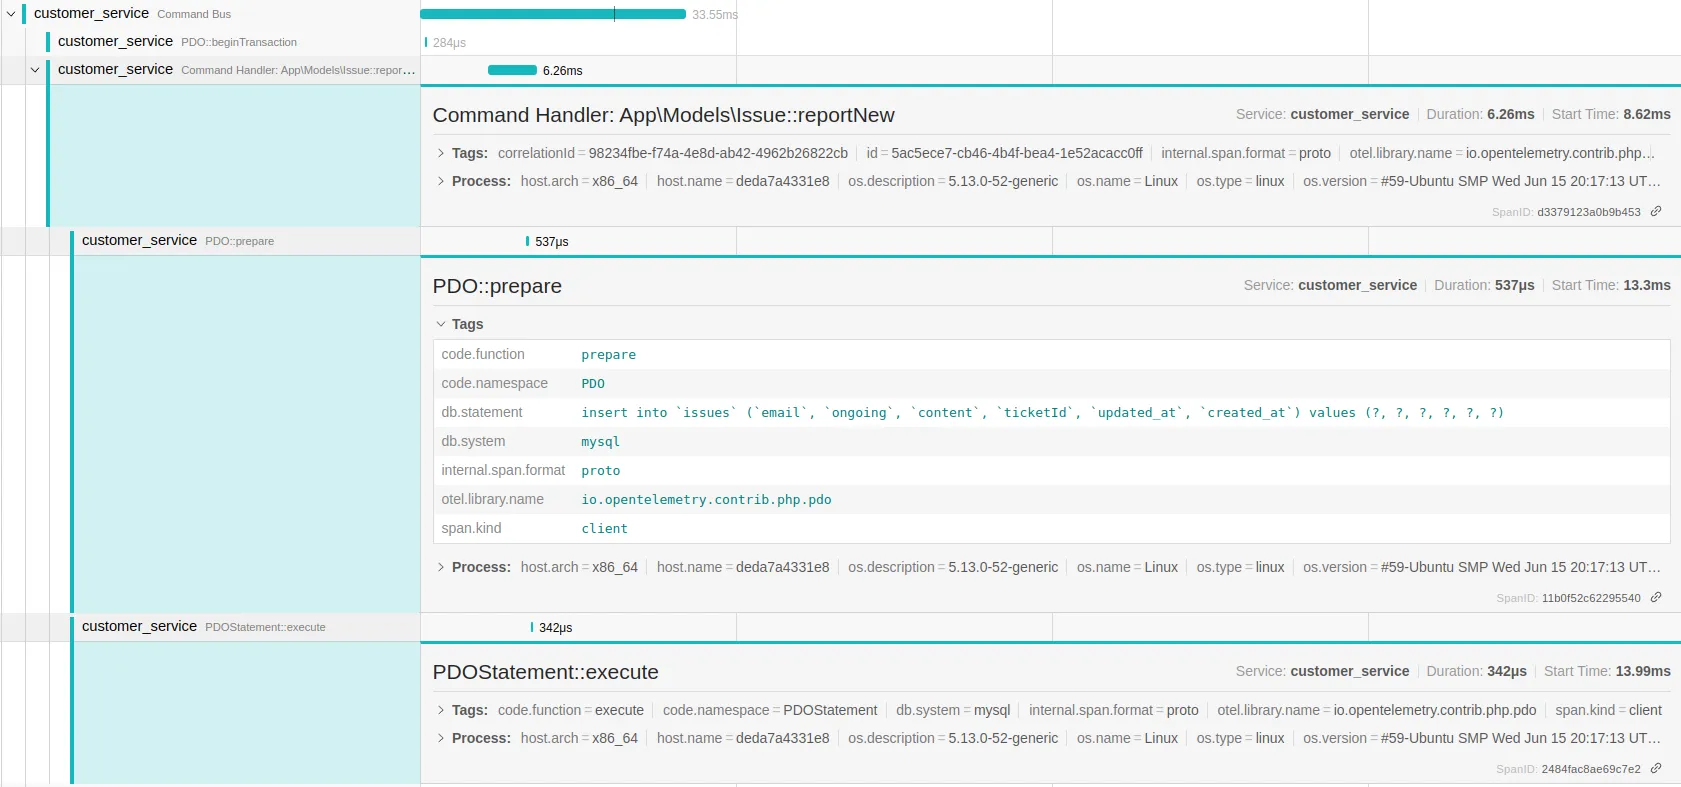
- Tracing goes even further and gives you a full view of the different spans in the call tree.
Tracing tools can be activated during acceptance test runs or even in production environments, allowing you to build an understanding of the entire path through your application (and especially towards the part of the code you want to break free). An important learning of this approach can be that certain parts of the codebase exist but are never used in practice: an exciting observation to simplify your legacy system :)
Probably the best thing about these tracing tools is that they can keep helping you understanding the behaviour of your application, even if you are not in an active modernisation track.
Opentelemetry, Jaeger & Auto-Instrumentation
With the emergence of open telemetry, there is a standard for collecting tracing data from a wide range of applications, both distributed and monolithic. Tools like Jaeger and various auto-instrumentation libraries make using this standard accessible, leading to dashboards like the one shown above.
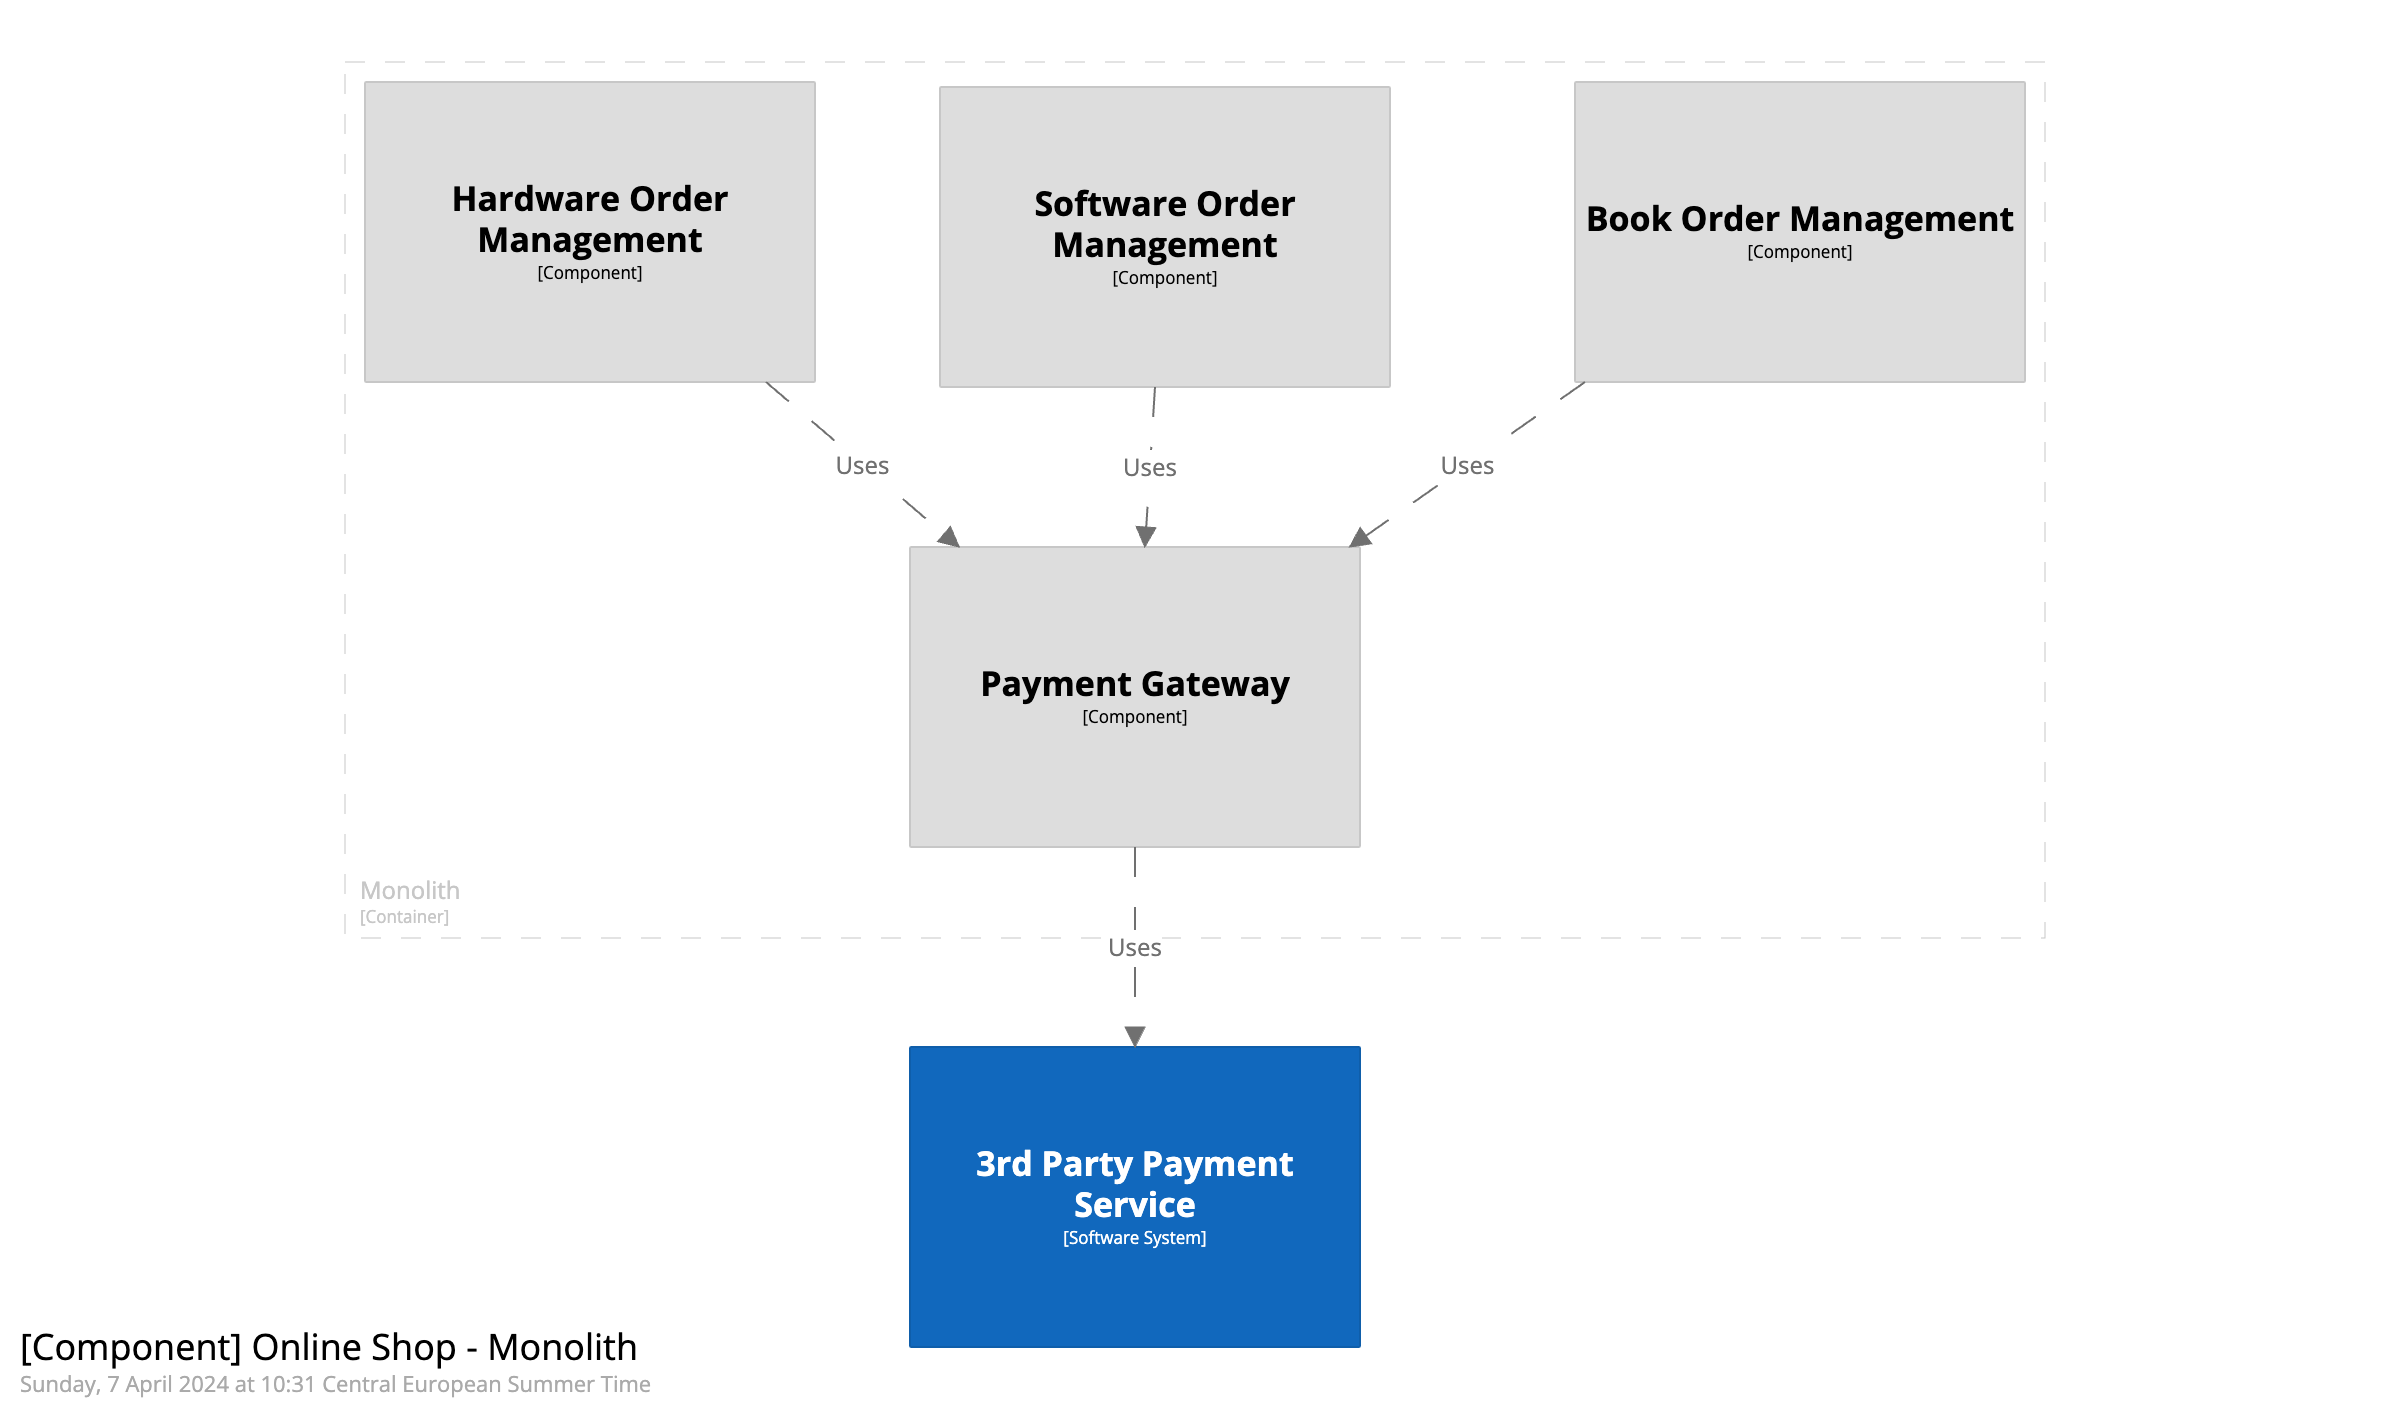
C4 architecture models provide a powerful tool that can be used at this stage to model the learnings and maintain a shareable and versioned model of the technical documentation. C4 is an easy-to-learn, developer-friendly approach to software architecture diagramming.
From the exercise above, assume that we learned that our current situation is as follows: Payments are made from three components in the online shop: the book, the software, and the hardware order management. Historically, two payment implementations were developed (including a "new" one 🤪) and used by one or more order management systems.
The hypothetical AS-IS would look like this:
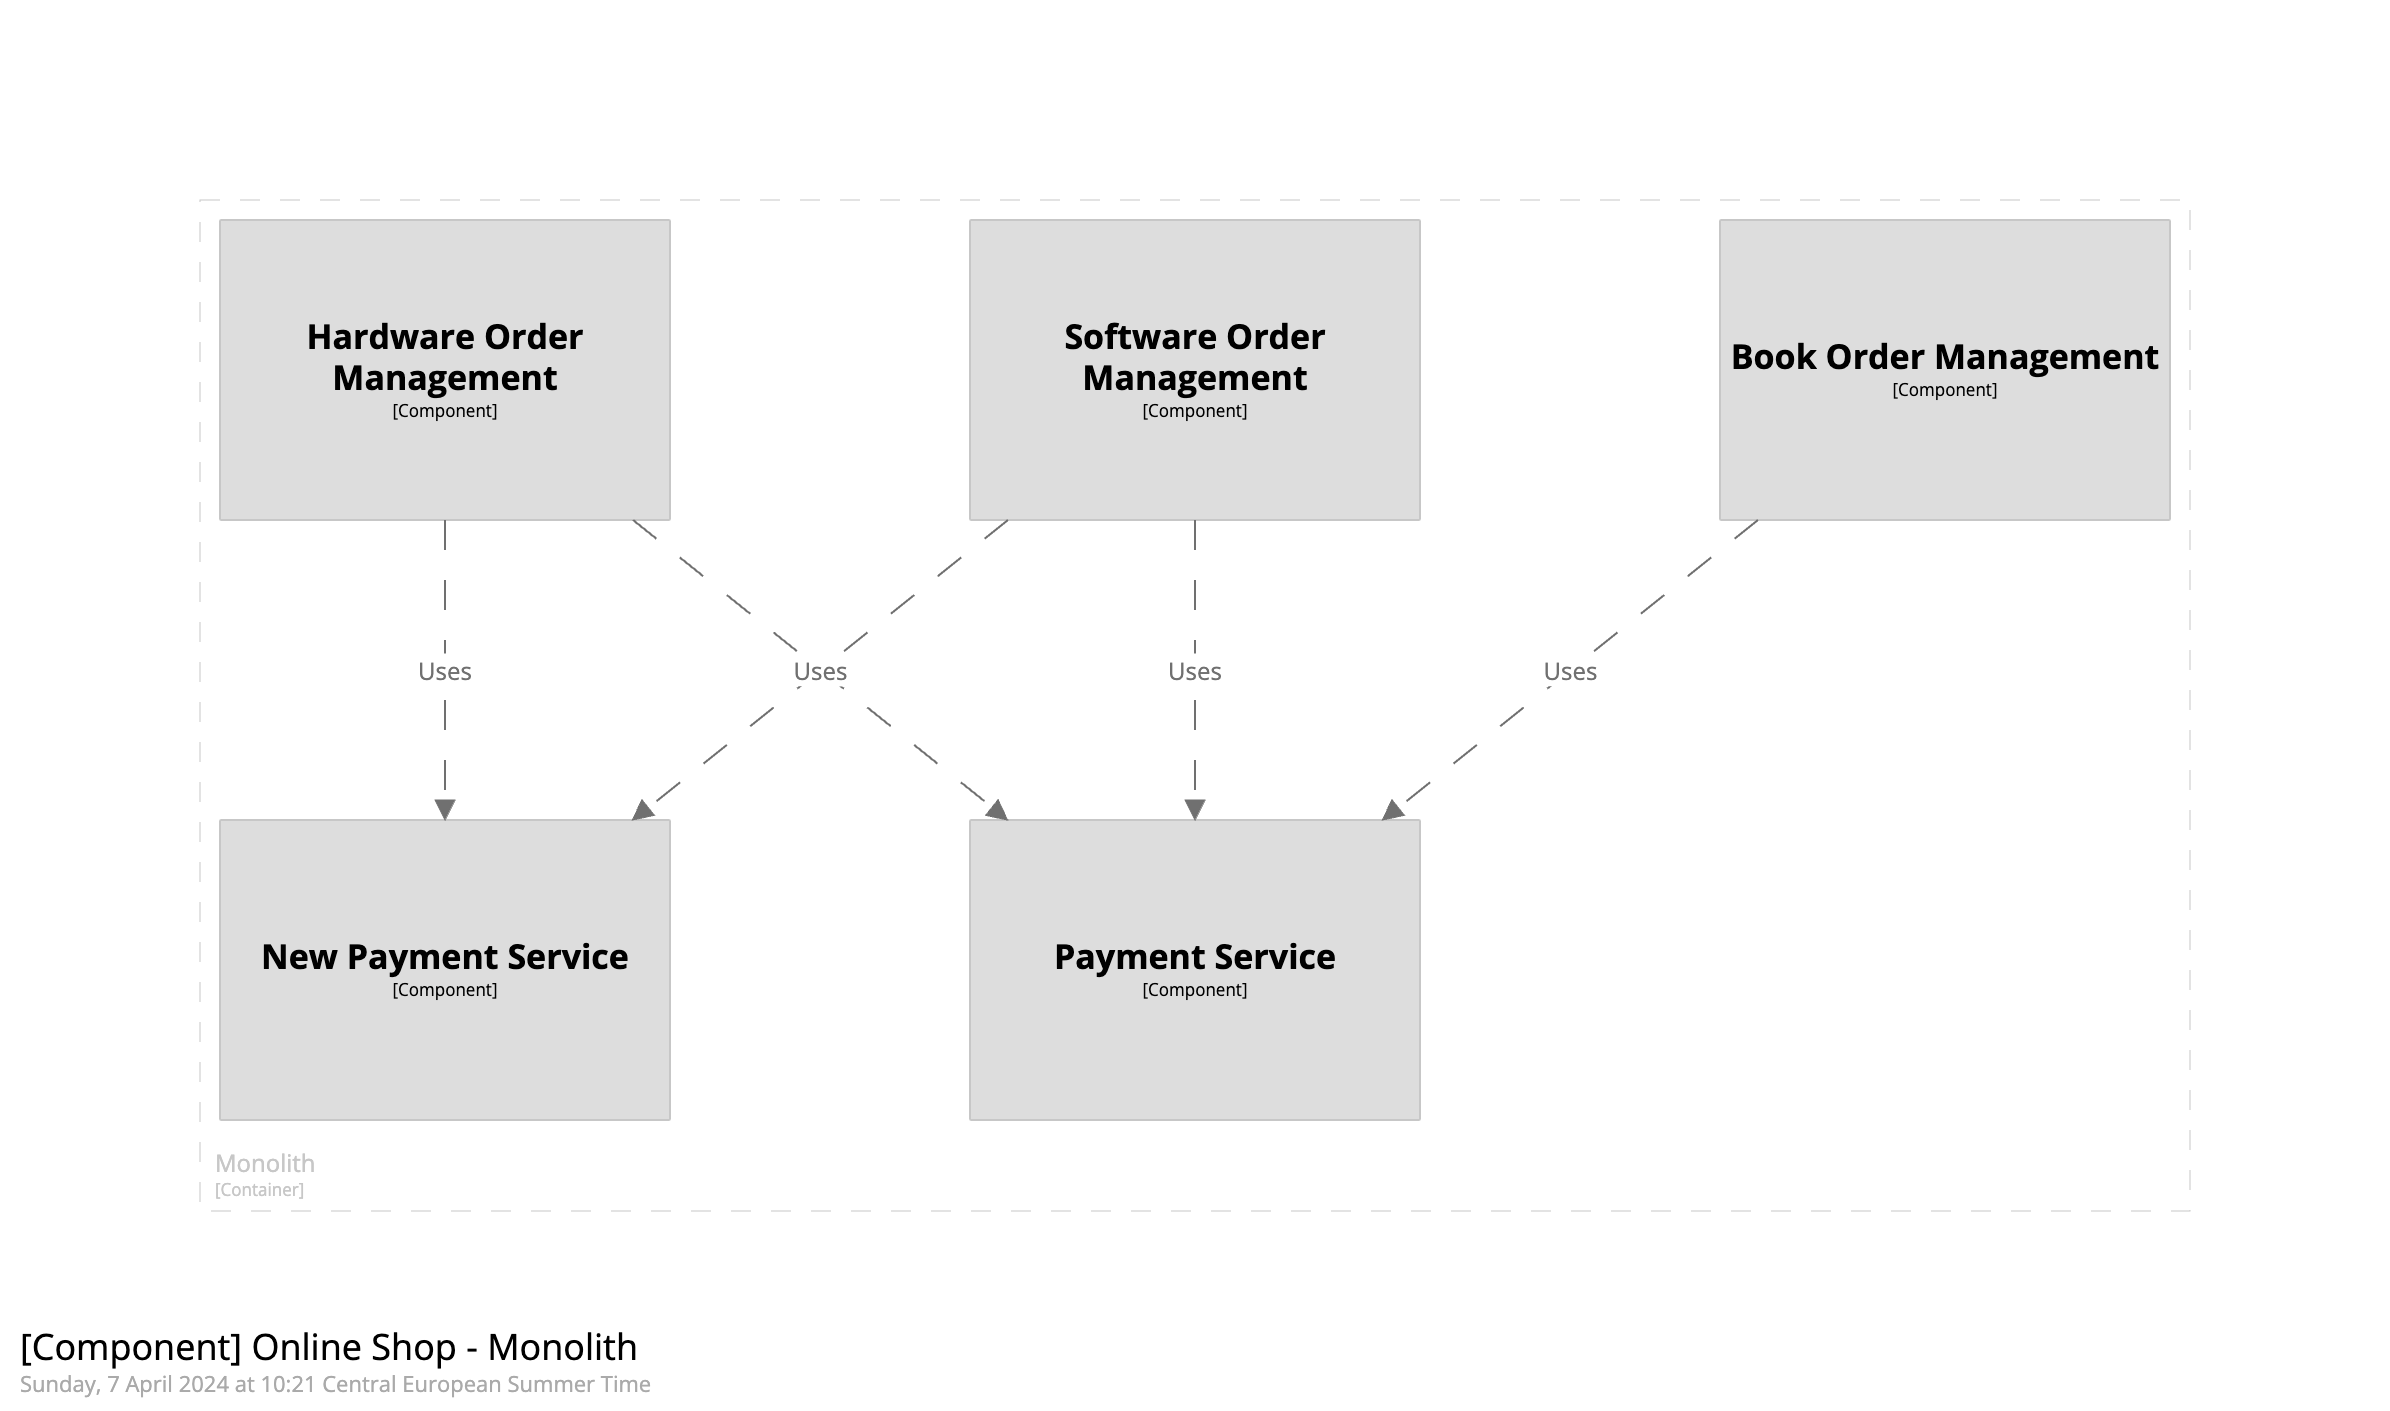
The target TO-BE could look more like this:
During refactoring, these diagrams will prove great tools to ensure all required areas are covered and the overall direction remains clear to all stakeholders. Over time, these diagrams (do not exaggerate with details in the documentation; the code remains the only truth!) will be super beneficial to new joiners or when you want to change a part of the codebase that is not fresh in everybody’s mind!
This completes step 2 of the Wheel of Legacy Software Modernisation, which validates our assumption from step 1. We are now ready to delve into the code and begin implementing changes.
Step 3: Testing // Validate we do not Create Regressions
A crucial element of software modernisation is validating that we do not introduce regressions. However, the reality of existing software is that there will be very little reliable documentation. Furthermore, the software's actual behaviour is only sometimes the ideal behaviour. Yet, we still want to keep the actual behaviour during the factoring. Functional improvement should be introduced in a later stage.
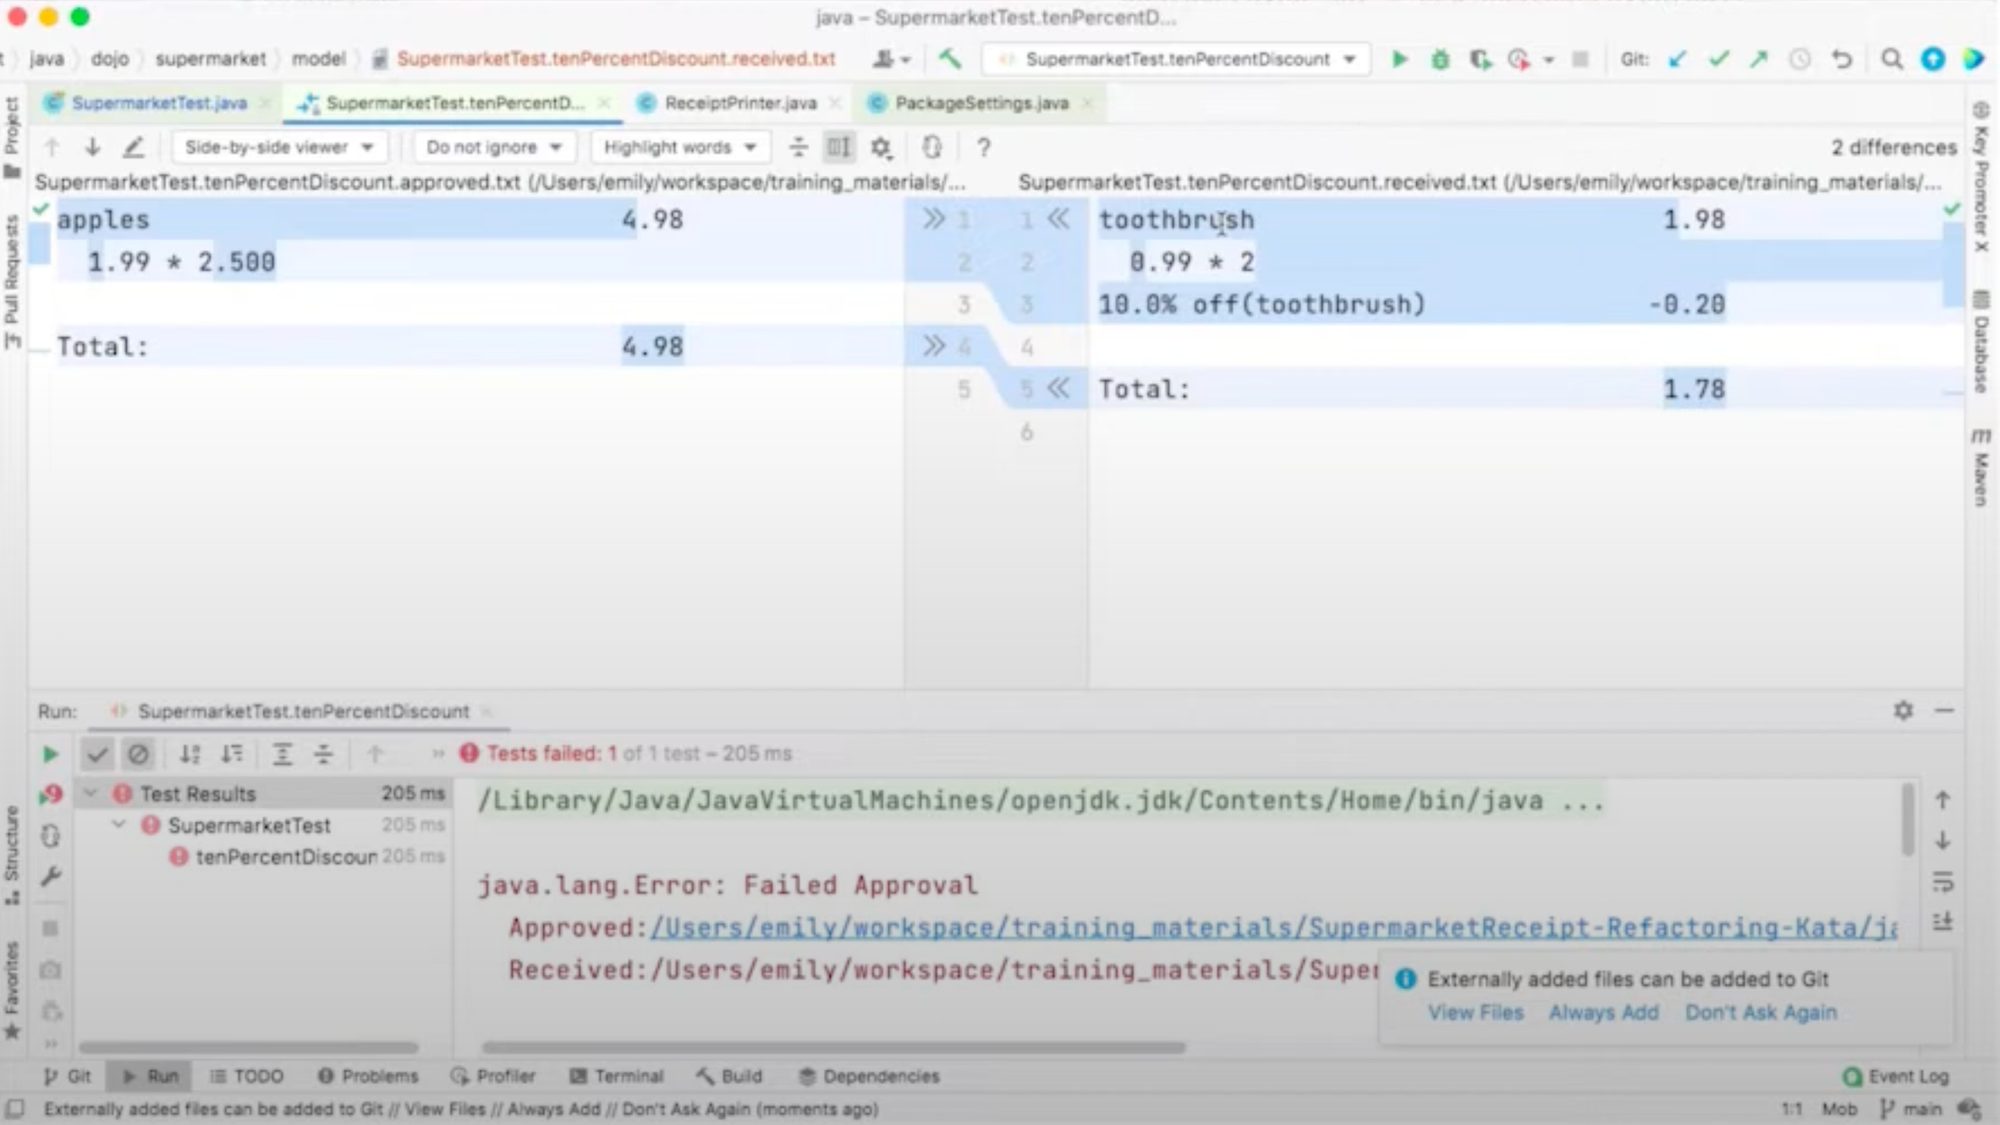
Michael Feathers introduced the concept of characterisation tests to address precisely this challenge. The idea of a characterisation test is that the current behaviour is recorded, and the outcome of this behaviour (whatever it is) serves as an expected result in the assertion. Creating these characterization tests allows for validating that refractory changes do not change the actual behaviour.
A big challenge remains: breaking the dependencies around the area you want to test. Unfortunately, this is a common challenge in legacy environments… where testability was likely not a big concern.
When we look at the testing pyramid, this challenge is more significant at the bottom and less so at the top. Indeed, with unit tests, there must be small units that can be tested independently, while this level of modularity is often lacking in legacy code.
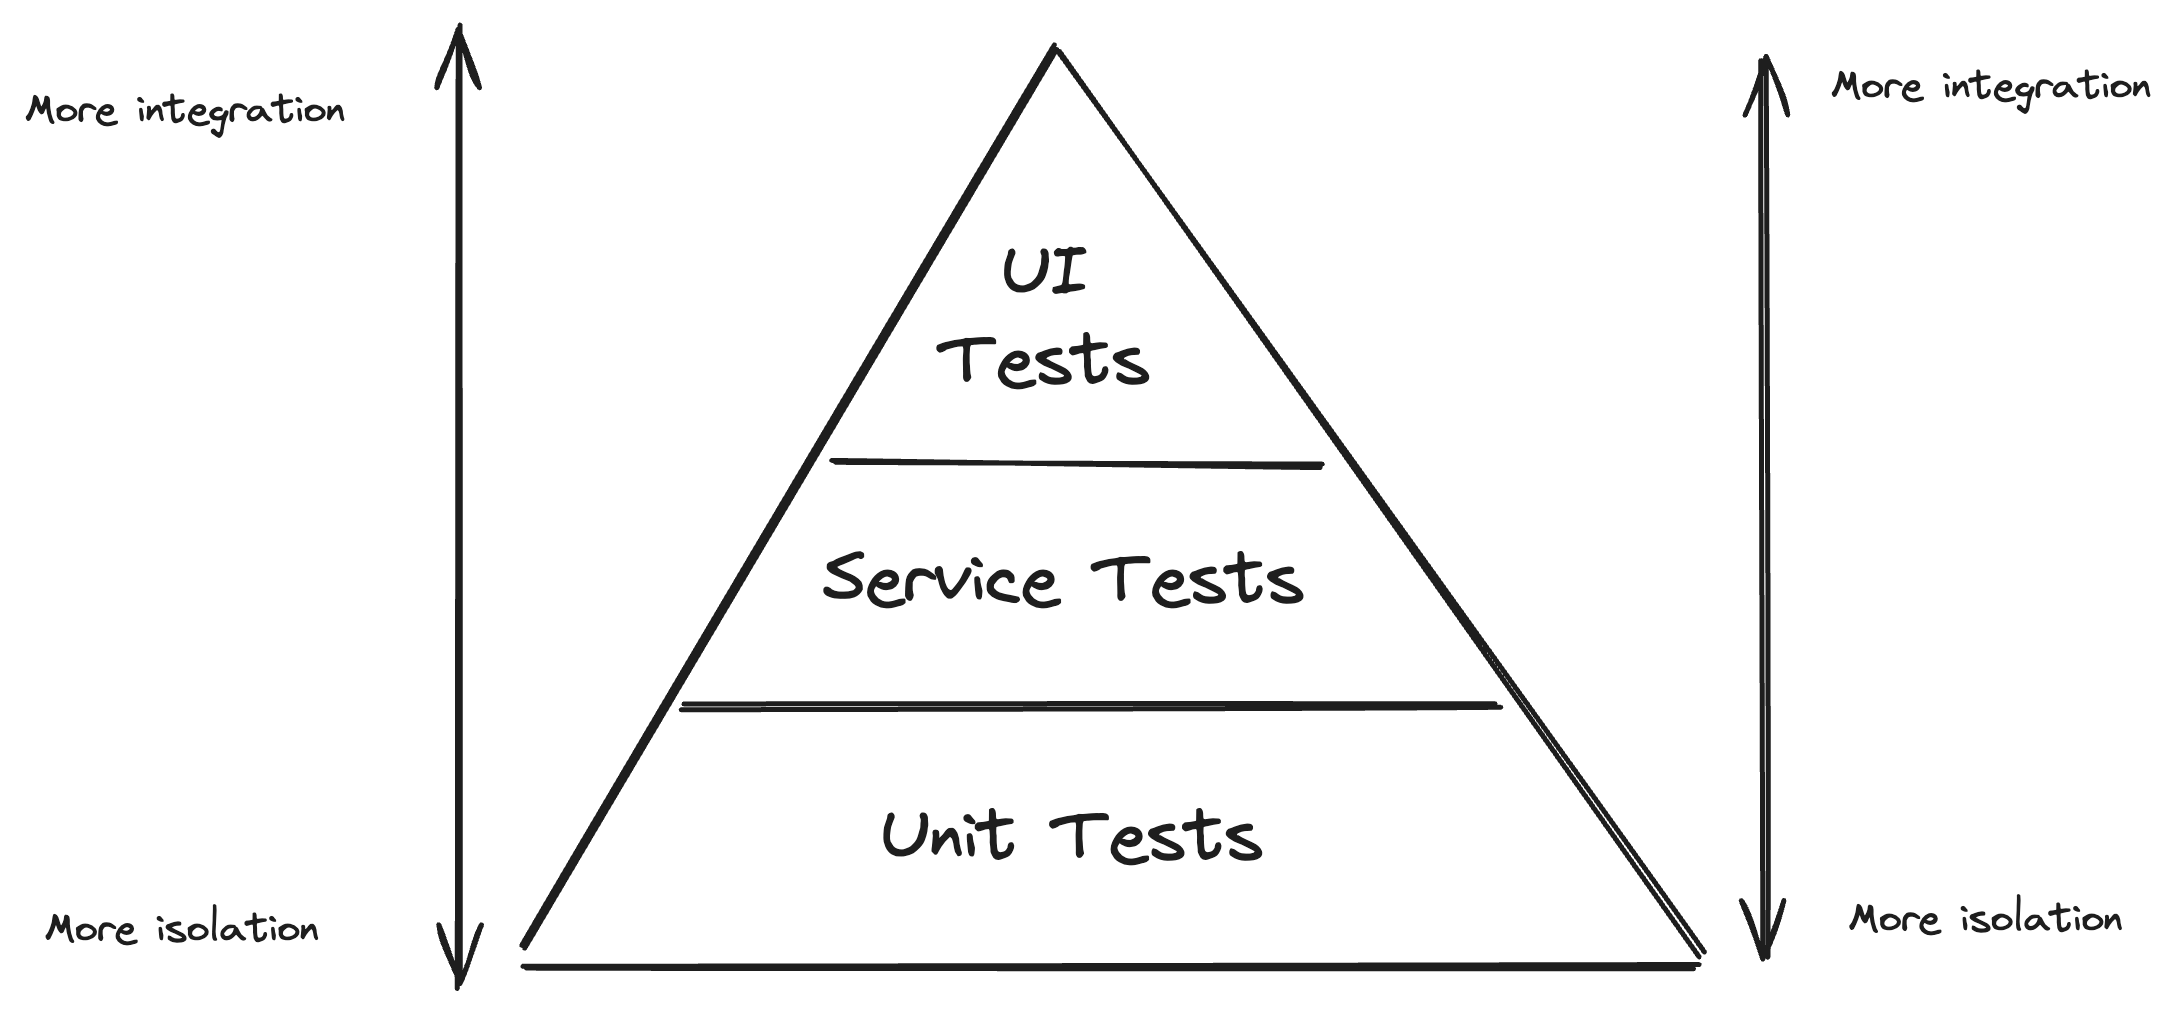
Complete end-to-end tests (through the UI) address this challenge and will validate the functionality end-to-end. Unfortunately, they are usually slow to run and hard to maintain. There must be better options for supporting the development cycle, where fast feedback will drastically help the developers.
Approval tests combine the idea of the “intermediate” service (or integration) tests of the testing pyramid with the recording (and approval) of the actual behaviour when running a test. This makes this a promising technique in legacy modernisation: they validate the exact current behaviour of a relatively large section of the code, reducing the challenge of breaking dependencies.
As usual, creating the right mix of test types for your environment and team is essential. You also want to focus on the area you want to refactor and change. In any case, you want the safety net of automated tests before you start fiddling with the runtime code!
In the example case, we want to wrap the relevant parts of the book, software and hardware order management in tests, so we make sure that any change in the payment functionality does not affect their behaviour.
I hear you thinking: "Three steps out of 4 are done, yet the production code is still the same!" Do not despair, however. The preparation will make your life so much easier. So, without further ado, let’s finally get to the decomposition of the code 👩💻
Step 4: Decomposition // Split the code into smaller chunks
There are only so many tools for this specific phase. Still, you are (hopefully) standing on the shoulders of your giant: a clear plan, a continuous integration system and a battery of (fast-running) tests to validate you do not introduce regressions.
If you have these, you are well prepared to take tiny, safe steps to clean up the code, prepare it for broken-up dependencies, and finally, inverse the control to swap one implementation for the other.
Your IDE typically contains several automatic refactoring tools (e.g., rename, extract function, introduce variable, …). Spend some time learning these and getting acquainted with the shortcuts.
A second precious resource is the catalogue of refactoring patterns that can be used as inspiration for your concrete challenges.
Two technology-agnostic books are Working with Legacy Code by Michael Feathers and Refactoring by Martin Fowler. There are also plenty of online resources (a few in the references section) and resources for specific languages.
LLMs do not yet understand the parse tree structure, so they are less safe than the “classic” refactoring tools typically part of your IDE. So, use AI as inspiration, but make sure it leaves no trace in your codebase: you have to understand it all!!
In part 4 of this series, we'll dive into a number of the concrete challenges you face when working in this stage.
A final note concerning the work in this step: As you refactor, you will likely add new code to the codebase. When doing so, do not create a new legacy (= untested code). Instead, add test automation as of the beginning, ideally in a test-driven development approach. This will help you create smaller, replaceable modules.
Step 5 .. n: rinse & repeat
Congrats, you made it for a complete cycle of the Wheel of Software Modernisation!
You may have had a bumpy road… Step 2 (inspection) will likely surface issues you ignored in Step 1 (orientation). Step 4 (decomposition, the actual code changes) may have been a frustrating experience (why does this test from step 3 keep failing? or even worse: why does this test NOT fail while the code is obviously wrong? Requiring you to add more tests, obviously 😉)… Still, you stepped in the right direction and learned much along the road.
The secret to sustainably improving your legacy code base is keeping this wheel spinning and taking small steps towards your end goal: make the codebase easy to change, reliably. Hush Hush, find the next seam 😄
Over time and with more experience, the changes you will make will become smaller and smaller, creating shorter iterations and less risky interventions. A good place to be in!
This marks the end of part 3 in the legacy modernisation series. Part 1 and Part 2 covered the context and the high-level migration strategies. With the tools and techniques under our belts, the next part will explore the challenges you’ll encounter working in a team occupied with refactoring.
References


Wheel of Software Modernisation // Step 1. Orientation


 ddd-crew
Wheel of Software Modernisation // Step 2. Inspection
Wheel of Software Modernisation // Step 3. Testing

Wheel of Software Modernisation // Step 4. Decomposition